Adding video to your website is essential in today’s market. Video makes it possible for you to leverage huge benefits from SEO that you might otherwise miss out on. However, simply adding a standalone video to your website is not enough if you truly want to reach a wider audience.
A standalone video limits you to only those audiences who can watch and hear. But what about those who are in a location where it is hard to hear, for example, in a noisy coffee shop or bus. Or even those who are hard of hearing. Video transcription and closed captions come in handy at this time by helping you connect with users who wouldn’t normally engage with just a standalone video. Not to mention that this is also good for SEO as it can help you climb the SERPs and get you to Google’s front page.
Why use video transcription?
Video transcription helps you reach a wider audience right off the bat. So, if you are serious about using video to boost engagement and grow your audience, always provide transcripts for your videos.
Transcripts increase engagement by allowing your viewers to follow along quickly or pull out the main points that are useful to them. They also make sharing content incredibly easy.
Which types of video transcription exist?

Manual video transcriptions
As the name suggests, manual video transcription is when you convert video content yourself without the use of any transcription software or tools. That means you type whatever you are listening to. You only need a text editing tool to achieve this.
This approach is highly recommended because the accuracy of the transcripts tends to be higher. However, with advancements in technology, there are transcription tools that can match the accuracy of manual transcription creation.
Automated video transcriptions
Automated video transcription is simply the use of transcription software to convert video content. This approach is faster and more affordable than transcribing manually. However, it does require a human to check for errors since these tools are never 100% accurate. So, if you choose this option remember to check for errors after the transcription has been created.
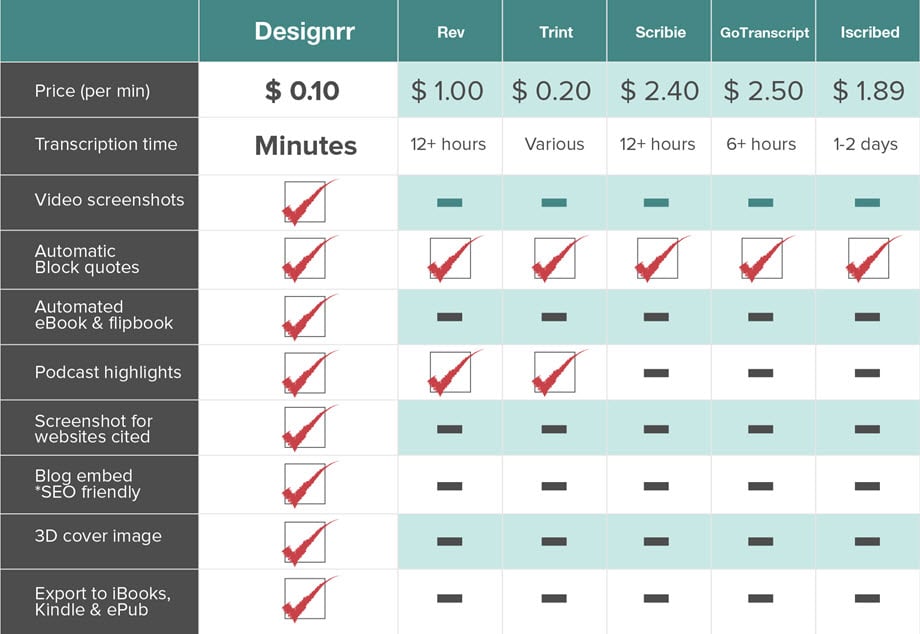
Here’s a comparison of the top transcription available today:
DIY (Do-It-Yourself) video transcriptions
Often, organizations distribute segments of transcription tasks to their staff to speed up the conversion process. For example, a 40 minute video that needs to be transcribed within an hour can be shared amongst two people, each handling a 20-minute segment. Considering it takes about 2.35 minutes for a transcriber to convert a 1-minute speech, then it will be possible to complete this task on time.
Bonus! The total time it takes to transcribe a recording depends on numerous factors and varies from one recording to another. For example, one hour of video or audio can take 4-9 hours to transcribe, depending on the number of speakers, subjects, and audio quality.
Now, in the event the two workers are unavailable, the DIY transcription option comes in handy. That means you do everything yourself.
Process-skills and tools
The entire process of creating transcripts for your videos is basically:
- Get a text version of the audio: transcript
- Format the transcript
- Upload the transcript and make it easy for users to find it from the video or audio file
If you start with captions
Normally for videos, transcribing audio to text is done to create captions. Then the captions file is used to produce the transcript.
With basic web skills and tools, you can easily create transcripts from caption files.
If you start with transcribing
It is not an easy job to transcribe an audio file for individuals who don’t have the right software or needed skills. In fact, many organizations prefer outsourcing the transcribing of audio and video files. Once you have the transcription, generating the captions is effortless with the right tools and skills.
Creating transcripts

It is easy to create transcripts if you already have the captions. In fact, most caption-editing tools provide a way to export a plain text transcript.
If you don’t have the captions, you will need a transcription of the audio content first.
Transcript file format
Normally most transcripts on the web are provided in HTML. There’s no design or formatting of the transcripts. It’s just basic text.
Here is an excerpt of a podcast interview with two speakers:
Speaker 1: Welcome to the podcast.
Speaker 2: Thank you for this opportunity to share information about accessibility.
Speaker 1: Would you start by telling us a little about your role at W3C?
Speaker 2: I work within the Web Accessibility Initiative, W-A-I, pronounced “way”.
Bonus! A descriptive transcript can be in a table so that the reader can easily follow along with the audio down a column if they choose.
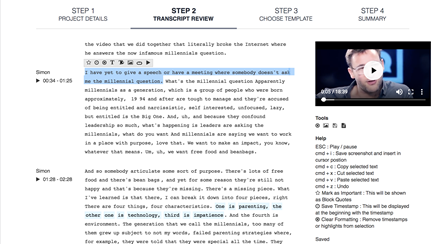
Making transcripts more useful

The core purpose of a transcript is to offer the content to people who cannot get it from the video or audio itself. But why not go a step further? Add even more value to the transcript by formatting it in a way that it is easier to consume. For example, add links, headings, time stamps, a summary, etc.
Ways to format your transcript:
- Put the content in logical sections, lists, and paragraphs: If you are starting with a captions file, you most likely are going to combine several lines into paragraphs. This makes it easier to understand when reading through the content.
- Add navigation and clarification: This includes adding links and headings where it will make the most logical sense. It’s also good for SEO. As well, you can include additional information to clarify certain points as needed. However, make sure to differentiate this content so that it is clear that it is not a part of the original transcript. For example, you can include additional words by putting them in square brackets [ ] or separate sections with headings, such as “Introduction”, “Transcript”, “Resources”, and so on.
- Show the speakers based on the type of content. You can do the following:
-
- If there are multiple speakers, you could use hanging indents to make it easy to skim through the content for a particular speaker.
- If you want the focus on the interviewee’s responses and not the interviewer, you can bold the interviewee’s name to make it more visible.
- Add timestamps only when useful. If you do add timestamps they don’t need to be as granular as the captions, plus no need to add end times.
- If starting with captions for video: The video might have text information that was not added in the captions, for instance, the title of the video or the title and name of the people speaking. Equally, if you have the video description, it should already be in there. Otherwise, you need to review the video and see if there is text that wasn’t added in the captions and include it to your transcript.
Where to put transcripts
You should always place your transcripts where they are easily accessible to your readers. For example, place the link or the transcript itself under the video. On your website, include both the video and transcription on the same page.
Including the Video File to HTML on your Website

Here are ways to achieve this:
- Host the video file directly on your website. Note that this requires you to provide the required bandwidth for the file.
- Use a third-party service like YouTube. With this approach be aware that you will lose control over ads played on your video. Not to mention that the length or file size can be restricted among other possible limitations.
Including captions to your HTML5 video requires you to:
- Save your video captions file as a WEBVTT FILE – using the .vtt extension
- Save your captions file to the same folder as your video file on your website server
- Add a tracking element to your HTML5 code.
See the example below:
<video width=”320″ height=”240″>
<source type=”video/mp4″ src=”/my_video_file.mp4″ >
<track src=”/captions_file.vtt” label=”English” kind=”captions” srclang=”en-us” default >
<track src=”/French_captions_file.vtt” label=”French” kind=”subtitles” srclang=”fr”>
</video>
Conclusion
Adding a video to your site’s landing pages or blog posts can be extremely beneficial. It helps with engagement, SEO, and conversions. However, it is worth embedding your video transcript and adding the captions to your video HTML to give even more value. Equally, make sure to optimize and format all the content on the page. This will help to boost your overall page performance and SEO. Plus, making it easier for your readers to consume the content.